


Aunt Teen’s Creamy Chocolate Fudge has been the star of our family holidays for as long as I can remember. This American classic delivers an unbeatable balance of rich chocolate and velvety smooth texture in every bite. It’s the kind of nostalgic treat that turns any occasion into something special, and I promise it will become your go-to dessert for gatherings. The recipe is surprisingly simple, using pantry staples to create pure magic.
Why You'll Love This Recipe
- Each bite is incredibly creamy with a deep, rich chocolate flavor
- You likely have most of the ingredients in your pantry already
- It’s perfect for making ahead and gifting during the holidays
- The recipe is foolproof and yields perfect fudge every single time
Ingredients You’ll Need
- Butter or cooking spray: Use this to grease your pan thoroughly so the fudge releases easily without sticking. I prefer butter for a hint of extra flavor.
- Granulated sugar: This provides the sweet base and structure for the fudge. Using fresh, dry sugar ensures it dissolves properly without grainy texture.
- Unsalted butter: Cut into pieces for even melting, it adds richness and creaminess. Unsalted lets you control the salt level perfectly.
- Evaporated milk: Its concentrated milk solids and lower water content help achieve the perfect fudge consistency without curdling.
- Salt: A small amount balances the sweetness and enhances the chocolate flavor. I use fine sea salt for even distribution.
- Semi-sweet chocolate chips: Choose high-quality chips for the best chocolate taste; they melt smoothly into the hot syrup.
- Marshmallow creme: This secret ingredient gives the fudge its signature creamy, smooth texture and helps prevent sugar crystallization.
- Pure vanilla extract: Always use real vanilla for the best flavor; it adds a warm, aromatic note that complements the chocolate.
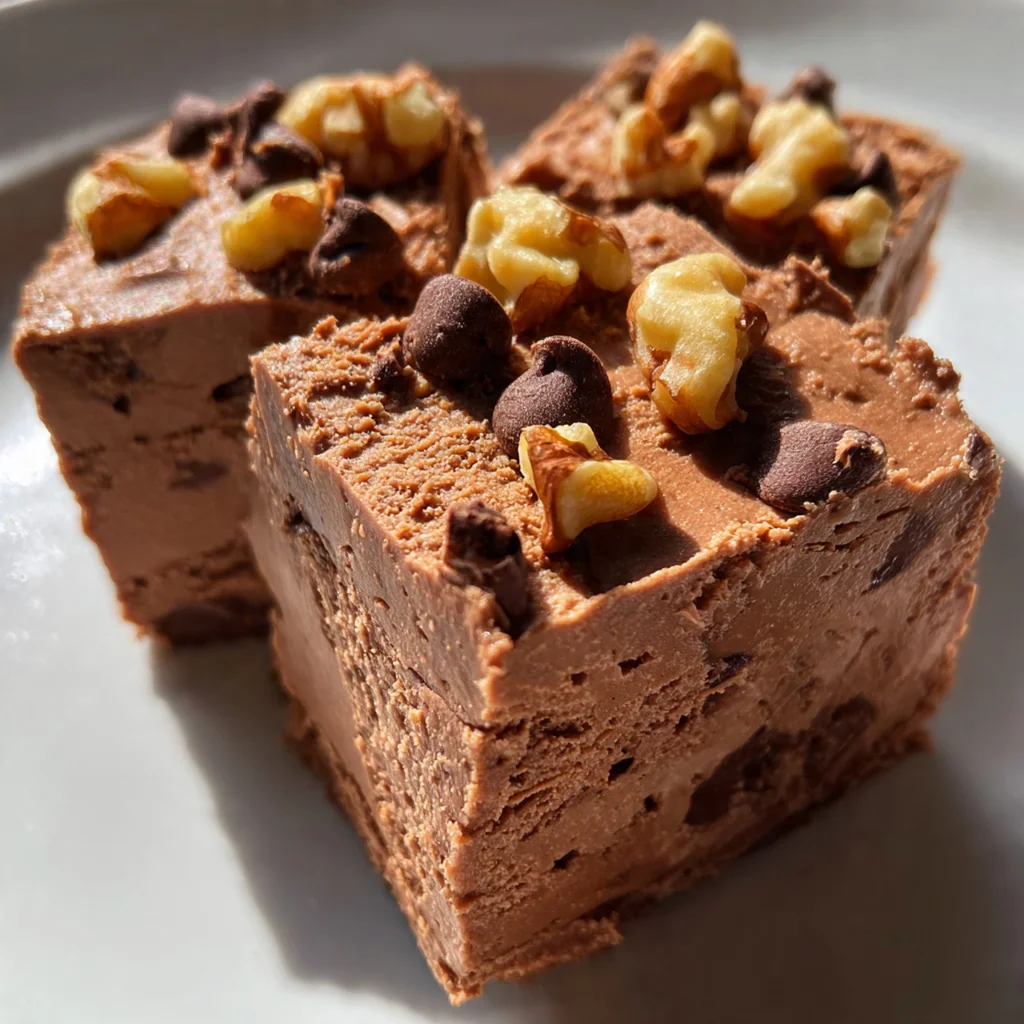
- Chopped walnuts: For added crunch and a nutty contrast, toast them lightly first to bring out their flavor.
- Sea salt flakes: Sprinkled on top after pouring, they create a delightful sweet-salty contrast that elevates the entire experience.
How to Make It
Prepare the Pan:
Line a 9×9 inch baking pan with parchment paper or aluminum foil, leaving an overhang on two sides. Lightly grease the lining with butter or cooking spray. This makes lifting the set fudge out a breeze and ensures clean edges.
Combine Base Ingredients:
In a large, heavy-bottomed saucepan, combine the granulated sugar, unsalted butter, evaporated milk, and salt. Place over medium heat and stir constantly with a wooden spoon until the butter melts and the mixture comes to a full rolling boil. This should take about 5-7 minutes and creates the foundation for your fudge.
Cook to Soft-Ball Stage:
Once boiling, stop stirring and attach a candy thermometer to the side of the pan. Continue to cook without stirring until the mixture reaches 234°F (soft-ball stage). This should take about 4-5 minutes. Removing it at the right temperature is crucial for that perfect, creamy texture.
Incorporate Chocolate and Marshmallow:
Remove the pan from heat immediately and carefully remove the candy thermometer. Add the semi-sweet chocolate chips and marshmallow creme to the hot mixture. Stir vigorously until the chocolate is completely melted and the mixture is smooth and well combined. You’ll see it transform into a glossy, thick batter.
Add Vanilla and Nuts:
Stir in the vanilla extract until fully incorporated. If using, fold in the chopped walnuts until evenly distributed. The vanilla enhances the flavor, and nuts add a wonderful texture contrast that makes each bite interesting.
Pour and Spread:
Pour the fudge mixture into the prepared pan. Use a spatula to spread it evenly into the corners. A smooth top makes for beautiful slices later, and you can tap the pan lightly on the counter to remove any air bubbles.
Cool and Set:
Let the fudge cool at room temperature for 2 hours, then refrigerate for at least 1 hour to set completely. Patience here ensures firm, sliceable fudge that holds its shape perfectly when you cut it.
Cut into Squares:
Once set, use the parchment overhang to lift the fudge from the pan. Place on a cutting board and cut into 1-inch squares. For clean cuts, use a sharp knife dipped in hot water and wiped dry between slices. This gives you those picture-perfect pieces.
You Must Know
- Use a heavy-bottomed saucepan to prevent scorching
- Don’t stir the mixture once it reaches a boil to avoid graininess
- A candy thermometer is your best friend for perfect fudge
- Let the fudge cool completely before cutting for a glossy finish
Storage Tips
Store your Aunt Teen’s Creamy Chocolate Fudge in an airtight container at room temperature for up to two weeks – it stays perfectly creamy and the flavors actually improve after a day. For longer storage, pop it in the fridge for up to three weeks, or freeze it for up to three months. Just separate the layers with parchment paper to prevent sticking. I often make a big batch ahead of the holidays and freeze it, then thaw it overnight on the counter for gifting or serving; it’s just as good as fresh.
Ingredient Substitutions
If you’re out of semi-sweet chocolate chips, bittersweet or dark chocolate chips work beautifully for a deeper flavor. For the walnuts, try pecans or almonds, or simply omit them for a nut-free version. In a pinch, you can use marshmallow fluff instead of creme – it’s essentially the same. And if you don’t have sea salt flakes, a tiny sprinkle of kosher salt on top does the trick. The vanilla is non-negotiable for me, but in a real emergency, you could skip it.
Serving Suggestions
I love serving Aunt Teen’s Creamy Chocolate Fudge on a festive platter during the holidays, arranged neatly with other cookies and treats. It’s also perfect for gifting – package the squares in decorative tins or boxes lined with parchment. For everyday enjoyment, enjoy a square with a cup of coffee or a glass of cold milk. You can even crumble it over ice cream for an decadent dessert. However you serve it, this fudge always feels like a special occasion.
Cultural Context
Fudge holds a special place in American culinary tradition, often associated with holiday gatherings, county fairs, and family recipes passed down through generations. Aunt Teen’s Creamy Chocolate Fudge is a classic example of this homemade candy tradition, where simple ingredients like sugar, butter, and chocolate are transformed into a rich, comforting treat. In many American households, making fudge is a festive activity, with the smell of cooking sugar signaling the start of the holiday season. This recipe, with its use of marshmallow creme, reflects a mid-century innovation that ensured creamy results every time, making it a staple in recipe boxes across the country. It’s a symbol of hospitality and warmth, often shared with neighbors and friends as a token of goodwill during festive times.

Pro Tips
- For clean cuts, use a sharp knife dipped in hot water and wiped dry between slices
- If you don’t have a candy thermometer, test for soft-ball stage with cold water
- Let the fudge cool completely at room temperature before refrigerating for a glossy finish
- My grandma always used the cold water test and it never failed her
Frequently Asked Questions
The signature creaminess comes from the combination of marshmallow creme and semi-sweet chocolate chips, melted together with a hot sugar syrup. The marshmallow creme acts as a stabilizer, preventing graininess and ensuring a smooth, velvety set that makes this fudge so special.
Absolutely! In fact, it’s an excellent make-ahead dessert. Once cooled and cut, store the fudge in an airtight container at room temperature for up to two weeks, or freeze it for up to three months. The flavor even improves after a day or two.
For authentic Aunt Teen’s fudge, marshmallow creme is essential for the right texture. While you can use about 16 large marshmallows melted with 2 tablespoons of corn syrup, the measurement and consistency are trickier. We highly recommend using the jarred marshmallow creme for guaranteed creamy results.
The critical step is bringing the sugar, butter, and evaporated milk to a full, rolling boil. You must maintain this boil, stirring constantly, for the full 5 minutes specified. The mixture will thicken slightly and become glossy. This ensures the fudge will set properly without being too soft or too hard.
This rich American dessert is perfect on its own as a sweet bite. For a dessert platter, pair it with salty nuts like pecans or walnuts, a cup of strong coffee, or a glass of cold milk. It also makes a fantastic homemade gift during the holidays.